![]()
What You’ll Need
- 3D-printed silencer
- Rubber tubing (about 10 ft)
- Four empty plastic bottles (2 L recommended)
- 20 zip ties (approx.)
- Four 3D-printed drip nozzles
- Water reservoir (8 L capacity)
- 3D-printed conduit
- Air pump (e.g. Hagen Marina 200)
- Growth medium
- Four small plants
- Nutrient solution
- pH testing kit
- pH modifier kit
Step-by-Step Instructions
Step 1: Download Digital Files

Basic parts you need to build our 4-bottle vertical hydroponics system:
- 4 drip nozzles
- 1 silencer
- 1 conduit
You can find these all these files and more on our Download Parts wiki.
Step 2: Gather the Remaining Materials
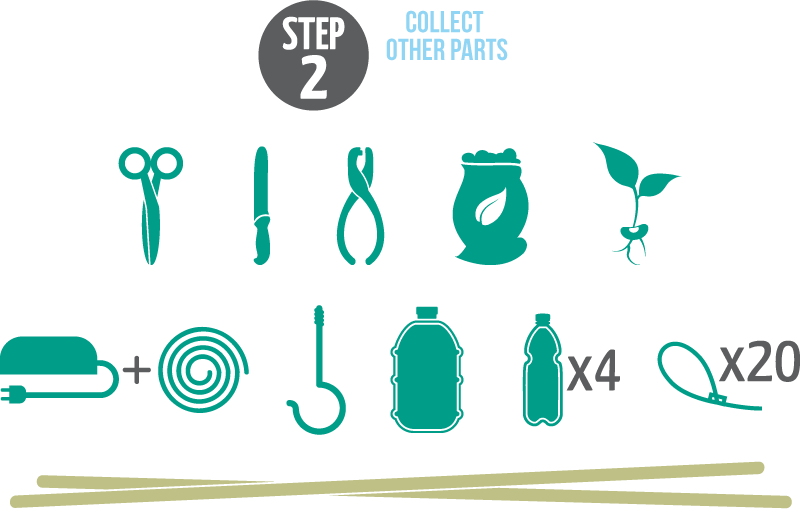
- 4 empty plastic bottles (1-L or 2-L bottles recommended)
- Hagen Marina 200 Quiet Aquarium Air Pump (or equivalent)
- 10 feet of rubber tubing
- 20 zip ties
- 2 bamboo sticks
- Support structure with a top hook (e.g. a coat stand)
- Growth medium (e.g. gravel)
- 4 small plant of choice (e.g. tomatoes, peppers, herbs)
- 8 L reservoir
You should also have some scissors, a knife and a hole punch on hand.
Step 3: Print the Parts
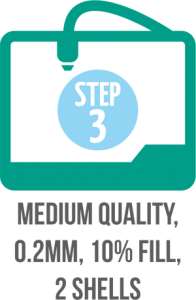
Print the digital files you downloaded in Step 1. If you’re working with a Makerbot, we suggest using the following settings for optimal results:
- Medium quality
- 0.2 mm
- 10% fill
- 2 shells
Step 4: Build the Support Column

Grab your bamboo sticks and fasten them together with zip ties to create a 6-foot pole. Attach the conduit to the bottom of the bamboo pole with more zip ties.
Note: The end of the conduit should stick out slightly from the bottom of the bamboo stick. This ensures stronger suction.
Step 5: Prepare the Plastic Bottles

Cut the bottoms off the plastic bottles. Punch four holes along the edges of each bottle, making sure that they’re lined up nicely with each other (they should be an equal distance apart and directly across from one another).
Step 6: Connect the Conduit
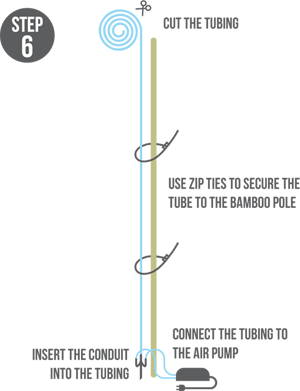
Measure and cut about 8 feet of tubing. Although you probably won’t use all of it, it’s good to have extra so that you have no problems connecting it to the silencer.
Using zip ties, secure the tubing to the bamboo pole. Cut the tubing at the bottom of the pole, where it connects to the conduit. Insert the middle point of the conduit as far as possible into the tubing; and connect the other two points to the air pump with more tubing.
Step 7: Attach the Bottles
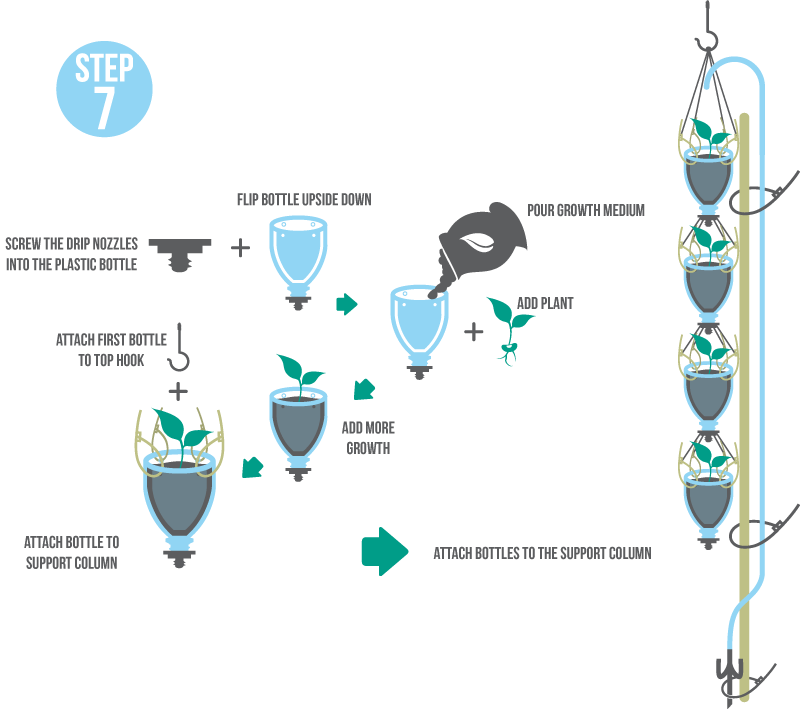
Screw the drip nozzles onto the plastic bottles like you would a bottle cap. Flip the bottles over so that the nozzles are pointing down.
Fill each bottle halfway with the pre-soaked growth medium, carefully add the plants, and cover with more growth medium. (The plants should be able to stand up on their own without toppling over.)
Next, use four zip ties to attach the first bottle to the hook at the top of your support column.
Step 8: Prepare the Reservoir
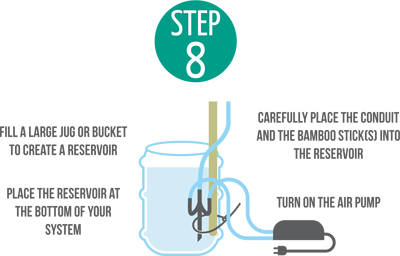
Fill your reservoir with water. Place it on the floor, underneath the bottles. Turn on the air pump and carefully submerge the conduit, rubber tubing, and bamboo sticks into the reservoir.
You’re now ready to grow fresh, healthy produce at home or at school for less than a penny per day. What’s more, you’ll be a part of something more meaningful: a community that’s building a brighter and healthier future with sustainable technologies.
Remember to join the 3Dponics online community and share your growing experience!
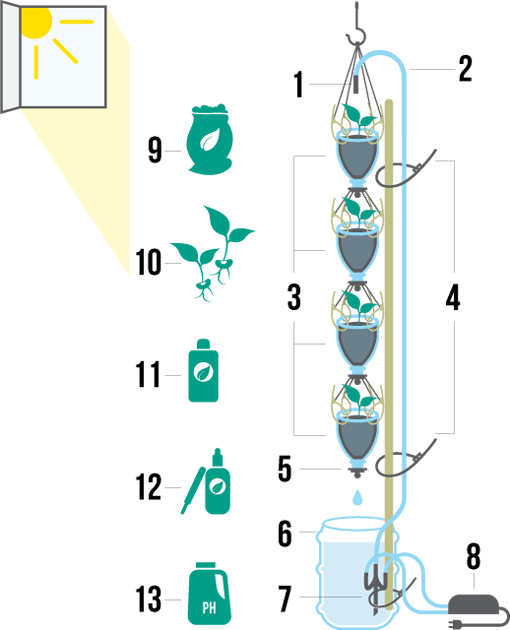
How It Works
The air pump collects the nutrient solution from the reservoir via the 3D-printed conduit and pushes it through the tubing to the top of the system.
The solution then drips out of the 3D-printed head and into Bottle 1. The excess solution drains out of the bottom of the bottle, through another 3D-printed drip nozzle, and into Bottle 2.
Eventually, the solution makes its way back into the reservoir, where it will be reused in the next watering cycle.
You’ll want to monitor the pH of your nutrient solution regularly and change the water every couple of weeks to replenish the nutrients and promote optimal plant growth.
Also, all plants need light in order to grow healthy and strong. As such, you should place your 3Dponics system in a brightly lit room, ideally next to a window. If this is not possible, you can set up LED lamps or other artificial lightning systems around your plants to ensure optimal growth.