What You’ll Need
- 3D-printed Bottle Connector
- 3 empty plastic bottles
- Nutrient solution
- Grow medium

Step-by-Step Instructions
Step 1: Download the digital files

For this system, the only essential 3D-printed part is the Bottle Connector. Optional upgrades include the Bottle Sleeve and the Drain. See full list of 3Dponics downloadable parts and upgrades.
Step 2: Print the parts

If you’re using a MakerBot or Ultimaker, we recommend the following settings:
- Medium quality
- 0.2 mm
- 10% fill
- 2 shells
Step 3: Assemble the bottles
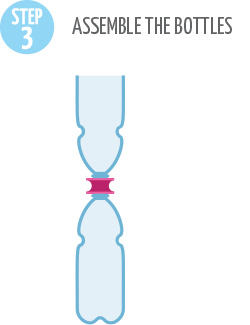
Cut the bottom of the bottle you’re planning to use as a planter. Screw it onto the top end of the Bottle Connector. Screw a second bottle to the bottom end of the Bottle Connector; this will act as the reservoir. Place the assembly on a flat surface or hang it on your wall (making sure that the top of the system is still within reach).
Step 4: Add the plant
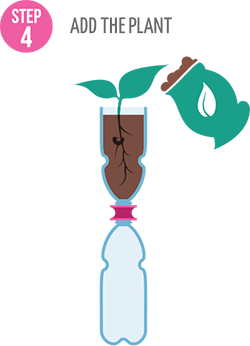
Gently add the plant to the planter bottle and surround it with grow medium, taking care not to damage the plant roots.
Step 5: Prepare the nutrient solution
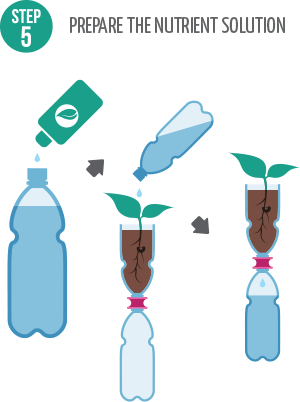
Fill the third plastic bottle with nutrient solution and slowly pour it into the planter. The solution will gradually drain into the bottom bottle.
Step 6: Watering your plant
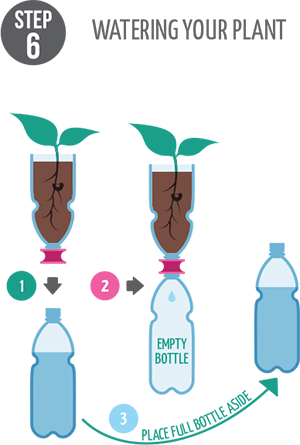
Carefully unscrew the full reservoir bottle from the bottle connector and replace it with the now-empty third plastic bottle. Place the full bottle aside until your next watering cycle. (We recommend you water your plant every couple of days.)
How It Works
This hydroponics garden is super simple: it requires no power and very few materials. Although the watering has to be done manually, you only have to do it once every few days.
When you pour the nutrient solution into the plastic bottle, the solution slowly makes its way through the grow medium, plant roots and Bottle Connector and drains into the reservoir. You then unscrew the reservoir from the Bottle Connector and connect another empty plastic bottle in its place. Save the full plastic bottle for the next watering cycle!
Alternate like this for as long as your garden makes you happy!